How To Of The Day: How To Survive An Earthquake

how-to-survive-an-earthquake

The Gulf Coast and East Coast have hurricanes, the Midwest and South have tornados, and the West Coast faces tsunami threats. No area of the country is without their own special brand of natural disaster to worry about. Earthquakes, however, span state lines, cross mountain ranges, and traverse climates. With the increased practice of deep wastewater disposal in the oil and gas industry, even the typically stable Midwest and central areas of the country are seeing an exponential rise in the number of earthquakes strong enough to get your house shaking (e.g., before 2009 there were an average of two magnitude 3+ earthquakes in Oklahoma; last year there were 907).

Surviving an earthquake starts far before the tremors begin, with careful preparation and planning. You should have enough food and water (a gallon per person per day) to last a minimum of three days, and communicate to friends and family where to meet and how to contact each other after an earthquake, assuming phone lines and electricity are down. Finally, take time to go through your house and secure tall, heavy pieces of furniture and appliances that might topple over. After an earthquake, be prepared to experience powerful aftershocks, and try to get to an open area as soon as it’s safe to do so. During an earthquake, the best survival techniques depend on your surroundings, so heed the tips above.

Illustration by Ted Slampyak

Source…


How To Of The Day: Hang Paintings Perfectly With A Fork

Hanging items on a nail isn’t hard, but it’s always tough to hang something you can’t see. You need the string to thread the nail, but not the wooden frame itself. You could photocopy a template, but your poster or painting might be too big. A simple fork can make the job easier.

Place the fork on the nail, with the handle sticking upwards and the nail going through the middle tines. The handle will be at a slight angle, which is perfect. Thread the painting rear wire or string behind the fork handle, and slide it all the way down to the nail. Then just pull the fork up and out. Voila, you have a perfectly hung painting.

Source…


How To Of The Day: How To Hot Wire A Car

How To Of The Day: How To Hot Wire A Car

Today we’re going to learn an always fun skill that will land you in jail if used improperly. As always, this article is FOR LEGAL PURPOSES ONLY. We don’t promote any illegal activities here.

This can be used to start your car when you’ve lost your keys, or to get a car going in an emergency or survival situation. You just never know when this skill will come in handy.

These methods are surprisingly simple. They may not work with all cars, particularly new ones that require microchip activation to get started.

The “Hot Wire” Method For Starting A Car

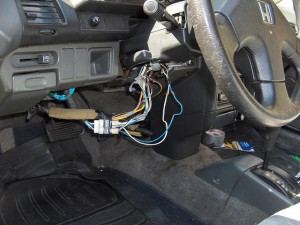
This method requires rewiring the car to bypass the ignition system.

  1. First you need to determine if the steering wheel lock can be disabled. Pull the steering shaft off the back of the steering wheel. Look for a little disk with holes that the lock pops into. If possible, remove the disk.
  2. Use a screwdriver to remove the access cover underneath the steering wheel.
  3. Remove the harness collector to gain access to the ignition wiring.
  4. Find the two red wires. Strip 1/2 inch of insulation off of each end, and then twist the wires together. Make sure the exposed wires do not touch any metal. Make sure these wires stay twisted when driving, as you will lose power if they come loose.
  5. Find the brown wire. Strip 1/2 inch of insulation off of the end.
  6. Touch the end of the brown wire against the twisted ends of the red wires until there is engine ignition.
  7. Once the engine is going, keep the brown and red wires separate, to avoid sparks and draining the battery.

The Screwdriver Method For Starting A Car

This method uses a drill to disable the lock pins, and will destroy the key switch. Once this is done, the key mechanism will be permanently damaged. Any key, screwdriver, or flat piece of metal will be able to start the car from this point on.

  1. Drill into the key hole, about 2/3 up, where the inner flap starts. Drill into it as deep as a key would.
  2. Remove the drill bit, allowing the lock bits to fall into place.
  3. Repeat steps 1 and 2 a few times, until all the bits are in place.
  4. Put a flat head screwdriver into the keyhole, and turn it the way you would a key.

Remember that these methods may cause damage to a car, so use only as a last resort.

Always wear insulated gloves when working with wires.

And again… only for legal purposes!

 
Source…

Load More