How To Of The Day: How To Sew A Button

How To Of The Day: How To Sew A Button

From The Art of Manliness:

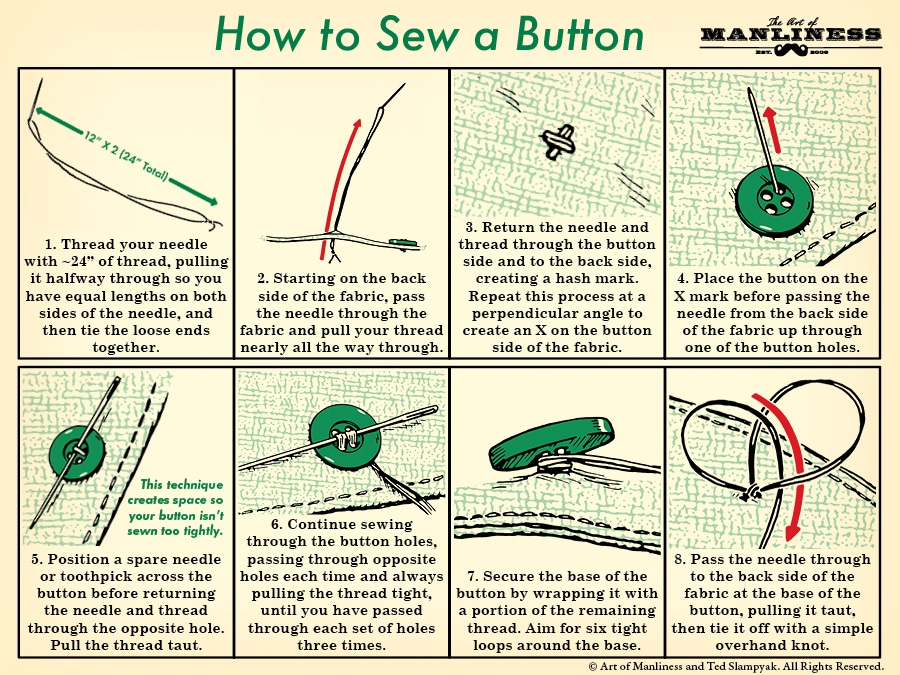
You might think that sewing isn’t a manly skill, and rely on your mom or wife to replace buttons for you when they’ve popped off a shirt or pair of pants. Yet men of yore often knew darn well knew how to patch a hole, mend a jacket, and yes, replace a button; if they lost one while marching to battle, sailing the seas, or simply traveling the world, they couldn’t rely on someone else to do it! It’s a skill that contributes to self-sufficiency.

Picking up a few basic sewing skills can prove exceptionally helpful even in modern times, especially in tight situations like losing the button on a dress shirt before an important meeting. To be extra prepared, consider carrying an emergency sewing kit with you in your travel bag, along with extra buttons in a few basic styles and colors. And don’t forget that most of your dress shirts, jackets, and pants have spare buttons sewn into the fabric near the pockets or edges of the fabric, so when the time comes to break out your new skill, they’ll be ready and waiting for your needle and thread.

In the guide above, we feature the parallel pattern for stitching a 4-hole button. You could also go with a square, an X, or even an arrow. With a 2-hole button, your options are obviously limited to just one pattern.
 

How To Of The Day: How To Build A Milk Jug Igloo

How To Of The Day: How To Build A Milk Jug Igloo

From Diy Created:

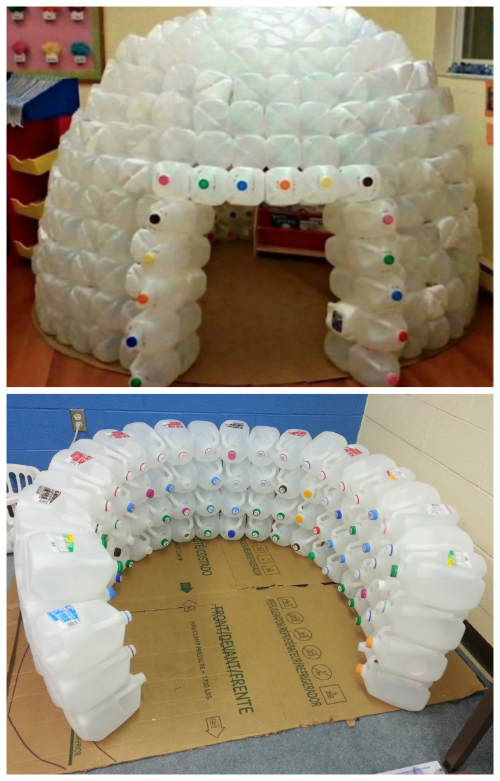
This fun project really is recycling at its finest. It’s wintertime and extremely cold in many areas of the country right now. Well with this educational project, you can embrace the cold, have fun with the kids (this would be an excellent project for a classroom), and teach everyone involved the importance of recycling in the process.

Now, we’re pretty sure you don’t have 250-300 empty milk jugs just laying around, so you’ll need to recruit some help from your students, friends and neighbors. If you’re in need of extra help aside from family and friends, check out website called FREECYCLE. You can sign up for free, and people will be happy to help you out.

This is not only a fun project, but provides a meaningful opportunity for education as well. You’ll have a chance to teach others about recycling and the very important role it plays in taking care of this beautiful Earth we live on.

One thing to keep in mind while doing this project before you watch the video below. You are dealing with empty milk jugs (or orange juice jugs). You will want to check and double check that they get properly washed out. If they don’t, you’ll smell your mistake.

If you are doing this project in a classroom, involve your students in all parts of the process. Make a progress chart to hang in your classroom, and as the kids bring in empty jugs, you can fill out the chart together and monitor the process. This further allows the children to be successful in reaching goals, which is a valuable life lesson that they can take with them into adulthood. It will take some significant time (probably) to collect your jugs, so be patient. When the kids bring the jugs, it will help keep track of the jugs better if you tie them together in groups of 10. This will also keep them for going all over the place.


How To Of The Day: The Basics Of Soldering

The Basics Of Soldering

Adafruit has some excellent tutorials and videos that go into more detail.

Soldering electronics is a delicate art. If you’re just getting started learning how to solder, this handy reference chart can help you spot some common mistakes and make sure your work comes out right.

The chart above from Adafruit is no substitute for a proper tutorial (though they have some of those as well), but it does pack a lot of information into a small space. When you solder a joint, you want to heat the pin and the pad for 2-3 seconds before you introduce your soldering material. If you don’t heat a part enough, heat it too much, or don’t add the right amount of solder, you can get some wonky looking joints. The right side of this chart shows how your joints might look if you mess up and what the problem was. The left side, meanwhile, reminds you which tools you should be using. For example, you should never use a soldering gun for tiny, detailed electronics work.

Source…


How To Of The Day: How To Survive A Fall Through Ice

Learn a life-saving self-rescue skill essential for all outdoors people who venture out into winter. By learning how to reduce your cold shock and get yourself out of the water with these techniques, you can save your life or help someone who has fallen through the ice to save theirs. This technique is designed for use in still water, such as a lake, and will work even if you are wearing bulky clothes. It allows you to move your body up onto ice that cannot support your standing weight, and teaches how to move over the ice until you reach ice with weight-bearing capacity.

If you are wearing skiis or snowshoes, you can first move through the cold shock portion of your self-rescue, then calmly attempt to raise your legs through applying even downward pressure with your arms on the ice shelf and arching your butt upward, followed by extending your legs out behind you. If successful, gently pull yourself forward. If this is unsuccessful, you must attempt to remove the skiis/snowshoes, or if necessary to save your life, your boots.

Cold water immersion is a potentially life-threatening situation. Do not attempt unless under professional supervision. This video was shot at the ReWild University training grounds in Wisconsin by a highly-trained wilderness instructor with rescue staff in attendance.


via

Load More